Popcorn Bag/Loot Bag Instructions
Thank you for purchasing a Sassaby Parties Popcorn/Loot Bag Template.
Please read through the following Instructions BEFORE attempting to download your digital files
Please read through the following Instructions BEFORE attempting to download your digital files
PRODUCT INFORMATION
This ready to Print & Assemble Loot Bag is high resolution 300dpi File, and measures 4” wide x 7 ¼” tall x 1 ½” deep {10cm x 18cm x 4cm} completed size.
If your Popcorn/Loot Bag is NOT editable, you can view/print your template using the default picture viewer on your computer such as Mac Preview or Windows Photo Gallery.
If your Popcorn/Loot Bag is EDITABLE, you must view/edit/print your template using the latest version of Adobe Reader (see more below).
YOU WILL NEED:
Good quality printer, regular white printer paper, scissors, sticky tape or glue, pinking shears (optional)
STEP 1: DOWNLOADING
Following the instructions either on your Download Page or in your Link Email, you must click the links to download your digital files.
Depending on your computer, you will either automatically be asked to save each file to your computer hard drive, or your file will Open/Download in an Internet Web Browser page.
IMPORTANT: Files must be downloaded/saved to a Mac or PC desktop or laptop computer. Files CANNOT be saved or used correctly using Tablets, Smartphones, iPhones or iPads.
It is very important that you DO NOT EDIT YOUR FILES IN YOUR WEB BROWSER after they have downloaded initially.
Your file must simply be saved to your Computer Hard Drive at this point.
STEP 2: EDITING
If you have purchased a Popcorn/Loot Bag that is NOT editable, please skip this step, and go to Step 3.
To edit your files, you will require the latest version of Adobe Acrobat Reader, which is a Free Download available for Mac or PC at http:// www.get.adobe.com/reader
When opened correctly in Adobe Reader, all editable files have embedded fonts, colours and sizes, and will appear as you see them in the examples online.
All editable Sassaby Parties files must be Opened in Adobe Acrobat Reader BEFORE attempting to Edit in any other way.
If files are Edited in a Web Browser, Mac Preview or any other program, the embedded editable fonts will not show up correctly, and the file will become corrupted.
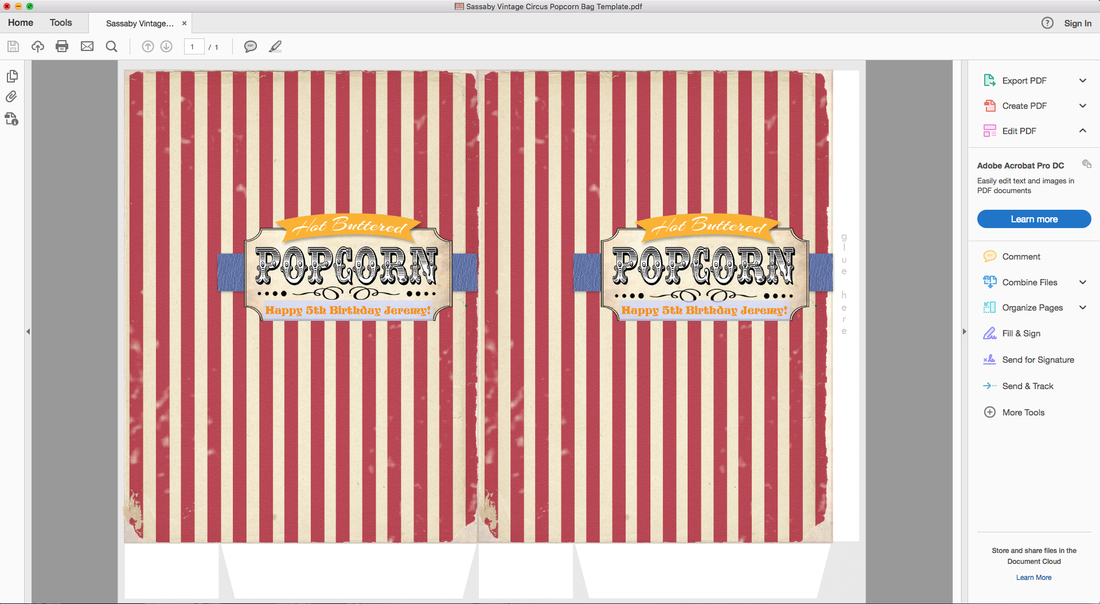
To Edit the text, change the highlighted ‘Example Text’ to your own information. (SEE IMAGE BELOW)
To edit your files, you will require the latest version of Adobe Acrobat Reader, which is a Free Download available for Mac or PC at http:// www.get.adobe.com/reader
When opened correctly in Adobe Reader, all editable files have embedded fonts, colours and sizes, and will appear as you see them in the examples online.
All editable Sassaby Parties files must be Opened in Adobe Acrobat Reader BEFORE attempting to Edit in any other way.
If files are Edited in a Web Browser, Mac Preview or any other program, the embedded editable fonts will not show up correctly, and the file will become corrupted.
To Edit the text, change the highlighted ‘Example Text’ to your own information. (SEE IMAGE BELOW)
HELPFUL HINTS
INCORRECT FONTS
If your files DO NOT contain the correct Fonts, and appear to have only a basic computer or small/incorrect font, something has gone awry, such as:
1. Not using the latest version Adobe Acrobat Reader to edit, or
2. You have attempted to edit & save your files online, before opening them in Adobe Acrobat Reader, or
3. Your file has opened by default in another program on your computer, such as Mac Preview, without your knowledge.
Sometimes, computers can open files in a ‘default’ program, such as Mac Preview (especially if you simply double click the file to open it, or right-click and select 'Open'). So even though you have the correct version of Adobe Reader, if your file is not open in this program, and opens in the wrong program, the embedded editable fonts will not appear correctly.
If you have downloaded your file online and opened it in a Web Page, then attempted to edit it and save it. Then found when you opened it in Adobe Reader the fonts are not working, it is because the file must ONLY be edited within Adobe Acrobat Reader (not online).
*To ensure you have the correct version of Adobe Reader, simply selecting ‘Check for Updates’ in an earlier version of Adobe Acrobat Reader is not enough. The most recent version must be downloaded independently for the embedded fonts to work correctly.
To correct an Error with Incorrect Fonts you must:
SAVING EDITED FILES
To save your edited files, simply select Save from the File menu in Adobe Acrobat Reader.
Only the latest versions of Adobe Acrobat Reader (Version 11, DC or newer) have the ability to Save Edited files with Mac & PC.
If there is no ‘Save’ option in the File menu, then you are not using the latest version of Adobe Acrobat Reader.
Please note: You can only save files in .PDF format using Adobe Reader, which is the same format as the original file.
- SPACES BETWEEN WORDS: If you are having trouble adding spaces between your words, or issues with the auto-resizing feature, simply add all required text, then add spaces after you’ve finished typing, using the mouse to insert them.
- BLUE HIGHLIGHTED FIELDS: To remove the blue highlighted areas, find 'Preferences' and click on 'Forms' and then under the heading 'Highlight Color' untick the box that reads 'Show border hover color for fields'.
- AUTO TEXT RESIZE FEATURE: The fonts are set to an auto sized text. The more text that is typed into the editable text areas, the smaller the text will become.
- REMOVING THE (+): If you see a (+) sign at the end of your text fields, this annoying little feature WILL print on your final copy. To remove it, in Adobe Reader go up to 'Preferences', then click on 'Forms' and under the 'General' heading untick the box that reads 'Show text field overflow indicator'.
INCORRECT FONTS
If your files DO NOT contain the correct Fonts, and appear to have only a basic computer or small/incorrect font, something has gone awry, such as:
1. Not using the latest version Adobe Acrobat Reader to edit, or
2. You have attempted to edit & save your files online, before opening them in Adobe Acrobat Reader, or
3. Your file has opened by default in another program on your computer, such as Mac Preview, without your knowledge.
Sometimes, computers can open files in a ‘default’ program, such as Mac Preview (especially if you simply double click the file to open it, or right-click and select 'Open'). So even though you have the correct version of Adobe Reader, if your file is not open in this program, and opens in the wrong program, the embedded editable fonts will not appear correctly.
If you have downloaded your file online and opened it in a Web Page, then attempted to edit it and save it. Then found when you opened it in Adobe Reader the fonts are not working, it is because the file must ONLY be edited within Adobe Acrobat Reader (not online).
*To ensure you have the correct version of Adobe Reader, simply selecting ‘Check for Updates’ in an earlier version of Adobe Acrobat Reader is not enough. The most recent version must be downloaded independently for the embedded fonts to work correctly.
To correct an Error with Incorrect Fonts you must:
- Delete ALL incorrect copies of your files from your computer.
- Re-download your files from your download page or email (or contact us if you need assistance with this step).
- When your file has downloaded into the web page, simply Right-Click and select Save –or- follow the computer prompts to Save your files to your computer Hard Drive, and take note of the location where you have saved them. (IMPORTANT: Do Not attempt to EDIT your files at this time.)
- Open Adobe Acrobat Reader, then go up to the File menu and Open your file(s).
- Begin to Edit the text & Save the file.
SAVING EDITED FILES
To save your edited files, simply select Save from the File menu in Adobe Acrobat Reader.
Only the latest versions of Adobe Acrobat Reader (Version 11, DC or newer) have the ability to Save Edited files with Mac & PC.
If there is no ‘Save’ option in the File menu, then you are not using the latest version of Adobe Acrobat Reader.
Please note: You can only save files in .PDF format using Adobe Reader, which is the same format as the original file.
STEP 3: PRINTING
We recommend Bright White Paper or Cardstock which is 120gsm in weight or heavier. This ensures a professional finish, and a nice shape to the pinwheels once they are assembled.
PRINTING A NON-EDITABLE JPG LOOT BAG
When using JPG files you have the option to Print at Home, at your Local Print Store or by Uploading your Saved files to an Online Printing Service. JPG files are accepted and can be printed almost anywhere.
PRINTING AN EDITABLE PDF LOOT BAG
When using Adobe Reader you have the option to Print at Home, at your Local Print Store or by Uploading your Saved files to an Online Printing Service that accepts PDF files.
WHERE TO PRINT?
Please visit the PRINTING TIPS page for detailed information and recommendations for print stores and online printing services.
EMAILING FILES
EMAILING TO A PRINTER
If you need to send your edited invitation/envelope files to a printer, we DO NOT recommend it. The edited text may not send correctly, and if the printer does not open the files using the latest version of Adobe Reader at the other end, the files will become corrupted, and will not be printable.
We suggest uploading your files to Dropbox, or a similar online cloud storage service. You can then copy the direct link and email it to your printer, for them to download to their computer.
**Please Note: The person at the other MUST still open the file(s) using the latest version of Adobe Reader, or the embedded fonts and edited text will become corrupted and will not show up.
STEP 4: ASSEMBLING
- Cut your Loot Bag on the outlines provided.
- Before assembling your Loot Bag, firstly fold all edges, giving a crisp fold to each.
- Then using normal paper glue or a glue stick add glue to the first edge marked ‘glue here’, which is the long vertical edge, and stick the bag edges together, matching up the printed design.
- To glue the bottom of the bag, fold in the two small rectangle tabs first, and add a layer of glue to each. Then fold the first long tab over the two rectangles.
- To glue tabs to each other, stand the bag up on a table and press down (you may need something long to assist in pressing down into the bag, such as a wooden spoon, or the handle of your scissors.
- Finally, add a small amount of glue to the bottom of the 1st glued tab, and press down on the final tab while standing the bag up to glue it into place.
- For some final touches, you can slightly fold the bag at the sides between the image panels – to look like an authentic Loot Bag, and cut along the top with scalloped scissors or pinking shears.